Friday, 26 October 2012

Dexter cupcakes

I normally like to make beautiful looking cupcakes but for Halloween, I want to make them look a bit spooky and creepy. As a big fan of Dexter, it comes naturally that my halloween cupcakes have to be Dexter themed. His collection of blood slides inspire me to make cupcakes with broken glass and blood. Of course they are both edible haha. For broken glass, I used sugar and corn syrup to make some sugar glass. For blood, I made some raspberry coulis and added a tiny bit of cocoa powder to make it more real. The tartness of raspberry is great to cut the sweetness of the white chocolate. To make the cupcakes more halloweeny, I designed some pumkin cupcake wrappers and bat shaped cards to put on the cuppies.

So many disasters happened to my halloween cupcakes. First, I went to two different supermarkets to buy raspberries but they don't have it. I had to go all the way to Harbour City to get them. Fine.
Second disaster was melting the white chocolate. I read a few recipes but one recipe just said melt the white chocolate without adding any cream in it. It seized and looked gross. I tried to save it by adding some cream in it. Not working. I put it in microwave hoping to melt it and of course it failed brutally. It's actually funny coz the white chocolate turned so hard that I couldn't even scrap it out of the bowl so I had to discard the white chocolate with the bowl!! I melted a new batch with hot cream and it turned out fine. Then the next disaster was I happened to set aside 1/4 cup of cream for melting the white chocolate but I didn't use it for my first batch. So I thought it was the melted white chocolate and accidentally poured it all in the cream cheese batter... The batter turned out very runny... I quickly improvised and added 1 more tablespoon of flour hoping to make it set a bit. The cheesecakes actually turned out ok. Thank god!

Here comes the worst nightmare. I was petrified of getting burned while I cooked the sugar coz it has to reach a temperature of 150C!! haha I even wore long sleeves and gloves to avoid getting burned. Fortunately I didn't get burned. The sugar cooked fine until it got to 140C. It started to caramelize and got brown. But it hasn't got to the target temperature yet and it was only 35mins after cooking so I let it cook a bit more. When it got close to 148C, I turned off the fire and added some blue coloring. I added way too much and the sugar turned really dark! My heart just sank. But I'm very happy that I tried something new and hopefully next year I will get it perfect.

This is what I hoped to achieve.

And this is what it turned out ... brown glass!! But oh well, halloween is supposed to be bloody and ugly.


Some pretty ones with raspberry swirls.

Dexter cupcakes for our halloween party. This year I'm dressing up as Lady Gaga. haha

Yield 16 cupcakes

Ingredients
For the crust
10 chocolate digestive biscuits
40g unsalted butter, melted

For the filling
450g cream cheese
1 tbsp all-purpose flour, sieved
1/2 cup sugar
1/2 tsp vanilla extract
2 large eggs, at room temperature
1 cup white chocolate chips
1/4 cup heavy cream

Sugar glass
2 cups water
1 cups corn syrup
3 1/2 cups white sugar
1/4 tsp cream of tartar

Raspberry coulis (yield 1 cup)
1/3 cup sugar
2 tbsp water
1 box fresh raspberries
1/2 tbsp lemon juice

Directions

For raspberry coulis
  1. Heat the sugar and water in a small saucepan over medium heat, stirring from time to time, until the sugar dissolves completely, about 5 mins.
  2. Put the raspberries, lemon juice and sugar syrup in a blender and puree.
  3. Strain through a fine mesh sieve to remove the seeds.
  4. Transfer bowl of puree to fridge and let it cool.
For cheesecake
  1. Preheat the oven to 160C. Line cupcake pan with paper liners.
  2. Crush the digestive biscuits in a food processor (or put in a plastic bag and bash with a rolling pin). In a small bowl, combine the crumbs and melted butter. Stir together with a fork until well blended and all the dry ingredients are moistened. Put 1 1/2 tbsp of the mixture into the bottom of each cupcake liner and evenly press the crumbs down by the bottom of a glass. Chill and let it set.
  3. Melt the white chocolate and cream in a small bowl over simmering water. Set aside to cool slightly.
  4. To make the cheesecake, beat the cream cheese on low speed in the bowl of an electric mixer until fluffy. Blend in sugar, flour and vanilla until smooth. Add the eggs one at a time, beating well after each one. Beat in the melted chocolate.
  5. Pour the batter over the crust. Add 3 drops of raspberry coulis on each cupcake and use a knife to swirl through batter to create marbled effect. 
  6. Bake for about 20 minutes. Transfer to a cooling rack and let cool to room temperature. Transfer to refrigerator and let chill for at least 4 hours before serving.
For sugar glass
  1. Mix water, corn syrup, sugar and cream of tartar in a pot and heat them slowly on low heat. If you heat it too rapidly, it will caramelize (become yellow & burnt). 
  2. Use a candy thermometer to bring the mixture up to the hard crack stage, around 290-300 F, which should take at least an hour to reach. (optional: Mix in food coloring to create a stained-glass appearance.) If you don't have candy thermometer, you can use cold water method by dropping a spoon of syrup in cold water. It's done when the sugar forms brittle and crack if you try to mold it.
  3. Cover the sheet pan with tin foil and spray it with non-stick cooking spray.
  4. Pour the mixture into the pan quickly and evenly as it will start to set as soon as it is removed from the heat. Be careful and avoid being burned.
  5. Shake the pan to get even coverage and to level the mixture. Wait an hour for the candy mixture to cool completely. Refrigerate the sugar glass until ready to use. Smash it to serve.
Cheesecake recipe barely adapted from raspberry swirl cheesecake cupcakes
Raspberry coulis recipe adapted from raspberry coulis

Tuesday, 23 October 2012

Spaghetti bolongese

It's just a simple and classic dish but it tasted so good coz hubby cooked for me. It's a massive plate but I ate it all. Thanks love!

Thursday, 18 October 2012

Pork loin with caramelized onion gravy

I was such a good housewife yesterday and cooked 3 proper meals! Mayonnaise parmesan chicken for lunch, lemon cheesecake for dessert and pork loin with caramelized onion gravy for dinner. My dad used to cook this dish when I was a child and I always loved to eat the rice with the delicious onion sauce. The aroma of the caramelized onion was divine while cooking. I think I should add a bit less flour next time and maybe even sieve the flour coz there were small lumps of flour in the gravy. This is a nostalgic dish to me but hubby said he never had this dish before! It tasted a bit different from the Chinese style onion gravy but it was still yummy.

Ingredients:
Onion Gravy
1 large red onion, thinly sliced
1 tablespoon unsalted butter
1 tablespoon all-purpose flour
1.5 cups chicken broth
1/2 tablespoon tomato paste

Salt and pepper

Directions:
  1. Heat butter in a large sauté pan. Add onions and cook over medium-high heat, until onions start to brown, stirring occasionally. 
  2. When onions are slightly softened and turning a deep honey brown, add 1/4 cup broth. Reduce heat, cover and continue cooking, adding more broth as needed to prevent caramelized bits at the bottom of the pan from burning. It should take at least 25 to 30 minutes to properly caramelize onions. 
  3. Stir in flour and cook for about 2 minutes. Stir in remaining chicken broth and tomato paste. Simmer for 5 minutes. Add salt and pepper to taste. Reduce heat to low and keep warm.

Wednesday, 17 October 2012

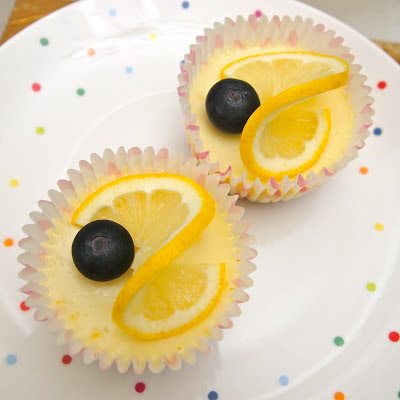
Lemon blueberry cheesecake cupcakes

I suddenly have a craving for lemon today so I decided to make some cheesecake cupcakes with them. Can't believe the first and the last time I made cheesecake was already 5 months ago! Since my first cheesecake didn't look that nice, I hoped they would turn out nicely this time after several months of baking practice.

I was so excited when I thought of using blueberry puree to make some beautiful dark purple marbling on the cheesecakes. But the puree was more like reddish brown color which was far from what I expected! I saw people's blueberry puree was quite purple. Wonder why mine wasn't purple at all. I tried to rectify it by adding some lilac food coloring and hopefully they would turn out beautifully like how I wanted but it still stayed ugly brownish. So instead of putting the puree on top of the cheesecakes, I just hide them sadly in the cream cheese batter. I would recommend to skip the blueberry puree step and just use fresh blueberries to garnish.

I should have filled the cupcake liners to almost full as I knew cheesecakes won't rise much but the recipe said fill it to 3/4 full. That makes my cupcakes look so small. I filled the second batch to almost full and baked for 20 minutes. They came out a bit too soft. Need to bake for probably 3 more minutes with more batter in it.

Apart from all those negatives, the cheesecakes this time do not break or sink and are much smoother and creamier compared to my first attempt. I'm not sure whether it's because I beat the batter as little as possible, added cream in the batter, hit the cupcake pan hard on table to get rid of extra air bubbles, use a hot water bath to increase the moisture in the oven or a combination of all of the above. Overall, hubby and I loved the cakes very much. The clean lemony flavor was impeccable with the creamy cheesecakes!


Sharing with other lemon and cheesecake lovers.
Make 10 cupcakes

Ingredients
For the crust
7 digestive biscuits
30g unsalted butter, melted
1 tbsp sugar

For blueberry puree
100g blueberry
some extra blueberries for garnish

For filling
335g cream cheese, at room temperature
1/2 cup heavy cream
1/2 cup sugar
2 large eggs, at room temperature
1/2 tsp vanilla extract
1 tbsp finely grated lemon zest
1 tbsp lemon juice
12 lemon slices for garnish

Directions
  1. Preheat oven to 160C. Line cupcake pan with cupcake liners.
  2. Crush the digestive biscuits in a food processor (or put in a plastic bag and bash with a rolling pin). In a small bowl, combine the crumbs, melted butter and sugar. Stir together with a fork until well blended and all the dry ingredients are moistened. Put 1 1/2 tbsp of the mixture into the bottom of each cupcake liner and evenly press the crumbs down by the bottom of a glass. Bake until just set, 5 minutes. Transfer to a cooling rack.
  3. To make the blueberry puree, blend it in food processor and pour through fine mesh sieve.
  4. To make the cheesecake, beat the cream cheese, heavy cream and sugar on low speed in the bowl of an electric mixer until fluffy (do not overbeat it).
  5. Add the eggs, one at a time, followed by vanilla extract, lemon juice and lemon zest, mixing well after each addition.
  6. Rap the mixer bowl hard on your counter to knock out the air bubbles trapped inside the filling.
  7. Spoon the mixture over the crust bases to almost full. Dot a 1/2 tsp of the blueberry puree in a few dots over the cheesecake filling. Use a toothpick to lightly swirl and create marbling effect.
  8. Put the cupcake pan in a hot water bath about halfway up (use a larger pan containing boiling water in which to place the smaller cupcake pan) and bake for 20 minutes.
  9. Let cool for 5 minutes then transfer to a cooling rack and let cool to room temperature. Transfer to refrigerator and let chill for at least 4 hours before serving.
  10. Serve with lemon slice on top.
Recipe barely adapted from lemon cheesecake cupcakes
Tips of baking cheesecake to avoid cracking and sinking

Saturday, 13 October 2012

chocoholic pistachio cupcakes

These cupcakes are specially baked for my chocoholic friend, Momo's birthday. I originally planned to surprise her with my homemade chocolate cupcakes on her birthday dinner, but she must be reading my mind and asked me to make her cupcakes!! To make it super chocolatey, indulgent and delicious, I tried to use as much chocolate elements as possible in the recipe. So I come up with the idea of chocolate cakes x chocolate chips x chocolate ganache x chocolate fudge frosting x chocolate sprinkles and some pistachios to add texture and color. To avoid overly sweet, some of the cakes have chocolate ganache and the others have chocolate fudge icing. You can also have a little bit of both on the cakes.
To make her cupcakes look even prettier, I designed some personalized cupcake wrappers and lollipop sticks with her name on it.


Then I just found out it is also my other friend, Andy's birthday! So I made some extra lollipop sticks with his photos. This is the first time I baked two dozen cupcakes! But you can never have enough chocolate cupcakes haha.


Yield 12 cupcakes

Ingredients

Chocolate cupcakes
1 cup all-purpose flour
1/2 cup unsweetened cocoa powder (I used Van Houten cocoa powder)
  • 1 tsp baking powder
  • 1/2 tsp salt
  • 90g butter, softened
  • 3/4 cup sugar, plus 2 tbsp
  • 1 egg, at room temperature
  • 2/3 cup milk, at room temperature
  • 85g cream cheese, softened
  • 1 tsp vanilla extract
  • 2 tbsp mini semisweet chocolate chips (I used Hershey's)
Chocolate ganache  
3/4 cup semisweet chocolate chips
1/2 cup heavy cream
OR
Chocolate fudge frosting
100 g dark chocolate (70%)
150 g butter, softened
4/5 cup icing sugar, sifted
3 1/2 tbsp cocoa powder
1 tsp vanilla extract

Directions:
  1. Place rack at the bottom of oven and preheat to 180C. Line cupcake baking pan with 12 cupcake liners.
  2. In a medium bowl, sift together the flour, cocoa powder, baking powder and salt, set aside.
  3. Using a mixer, cream the butter and 3/4 cup sugar until pale yellow, about 1 minute. Add the egg and stir until just combined. Gently add half of the flour mixture and stir until just incorporated. Mix in the milk. Add the remaining flour mixture and stir until combined. Set aside.
  4. In a small bowl, mix together the cream cheese, 2 tablespoons sugar, and vanilla. Stir in the chocolate chips.
  5. Fill prepared cupcake liners with enough chocolate batter to just cover the bottom. Add a dollop of the cream cheese filling to each, then top with remaining chocolate batter (cream cheese filling should not be visible).
  6. Bake for 20minutes. Let cupcakes stand in the pan for 3 minutes and then remove and allow to cool completely on a rack.
  7. For chocolate ganache, place a heat-proof bowl over a pot of simmering water, and whisk together the chocolate and heavy cream. Continue whisking until chocolate is melted and the mixture is thick, about 4 minutes. Remove from heat and let stand for 5 minutes.
  8. Dip each cupcake into the ganache, forming an even layer of frosting.
  9. For chocolate fudge frosting, place a heat-proof bowl over a pot of simmering water to melt the chocolate and let it cool. In a separate bowl, beat the butter until light and creamy. Add the vanilla extract, icing sugar and cocoa powder and mix until smooth. Add the melted chocolate and beat until creamy. Pipe onto cupcakes.
  10. Add chocolate sprinkles and chopped pistachios to decorate.
Chocolate cupcakes and ganache recipe from chocolate cream cheese cupcakes with ganache frosting
Chocolate fudge recipe from chai cupcakes

Wednesday, 3 October 2012

Crispy cheesy chicken tender

Tonight, I tried another chicken recipe and it was as good as it looks in the recipe. The chicken was baked into golden brown with crispy cornflakes and melted cheese. The crunchy and gooey texture are a good match. Very easy to cook and it only took 10mins to prepare. Will definitely cook it again. Next time I'm gonna spice it up with some cayenne pepper.

Serves 2

Ingredients
2 skinless, boneless chicken breast
Pinch of salt, pepper and parsley
1/4 cup milk
3/4 cup cheese, grated (I used cheddar and mozzarella)
3/4 cup cornflakes, crushed
1/2 can cream of chicken soup

Directions

  1. Cut each chicken breast into 3 large chunks. Season with salt, pepper and parsley.
  2. In a small food processor, grind up the cornflakes. If you don't have a food processor, you can simply crush them with a spoon.
  3. Pour the milk, cheese and cornflakes into 3 separate plates. Dip each piece of chicken into the milk, then the cheese. Press the cheese into the chicken with your fingers. Then press the cheesy chicken into cornflakes and press it in. Try to cover the whole chicken piece but it's ok if some cornflakes fall off. Once the cheese melts in the oven, it will adhere nicely to the cornflakes.
  4. Put baking paper on the oven pan and lay the chicken inside the pan. Cover the pan with tin foil and bake at 180 degree for 10 minutes. Remove the tin foil, bake at 200 degree for an additional 5-10 minutes, or until the cornflakes are golden brown and crispy.
  5. Into a sauce pan, combine the cream of chicken soup with 1/4 cup water. Stir it over medium heat until the sauce is nice and hot. Serve over the chicken.

Recipe adapted from crispy cheddar chicken